Access Pi Remotely Free: The Ultimate Guide For Remote Raspberry Pi Control
Have you ever wondered how to access your Raspberry Pi from anywhere in the world without breaking the bank? Accessing your Pi remotely for free is not only possible but also surprisingly simple. Whether you're a tech enthusiast, a DIY hobbyist, or just someone curious about remote computing, this guide will walk you through everything you need to know. So, buckle up and let's dive into the world of remote Pi access!
Imagine being able to control your Raspberry Pi from your phone, laptop, or even a public computer while sipping coffee at your favorite café. Sounds cool, right? Well, it’s totally doable, and we’re here to show you how. In this article, we’ll break down the steps, tools, and tricks to access your Pi remotely without spending a dime. It’s like giving your Pi superpowers, but for free!
Before we get into the nitty-gritty, let’s set the stage. Accessing your Pi remotely is more than just a tech trick—it’s a game-changer for projects, automation, and even remote work. Whether you’re managing a home server, running a media center, or just tinkering with code, remote access opens up endless possibilities. So, let’s get started and unlock the potential of your Raspberry Pi!
Read also:4k Khatrimaza Movies Download Your Ultimate Guide To Highquality Entertainment
Why Access Pi Remotely for Free?
Let’s face it—Raspberry Pi is awesome, but its true potential lies in how you use it. Remote access allows you to manage your Pi from anywhere, making it perfect for projects that require constant monitoring or updates. Plus, who doesn’t love saving money? Here are a few reasons why accessing your Pi remotely for free makes sense:
- No Subscription Fees: Many remote access tools come with hefty subscription costs. With free methods, you can enjoy the same functionality without burning a hole in your wallet.
- Flexibility: Whether you’re on Windows, macOS, or Linux, free tools offer cross-platform compatibility, ensuring you can access your Pi from any device.
- Security: Free doesn’t mean insecure. Many open-source tools provide robust encryption and authentication methods to keep your Pi safe from unauthorized access.
- Learning Opportunity: Setting up remote access teaches you valuable skills in networking, SSH, and configuration, which are essential for any tech-savvy individual.
So, why pay for something you can get for free? Let’s explore the methods that make remote Pi access both affordable and effective!
Understanding SSH: The Backbone of Remote Access
SSH, or Secure Shell, is your best friend when it comes to accessing your Raspberry Pi remotely. Think of SSH as a secure tunnel that lets you communicate with your Pi over the internet. It’s like sending a secret message that only you and your Pi can read. Here’s why SSH is crucial:
Security First: SSH encrypts all data transmitted between your device and the Pi, ensuring that no one can eavesdrop on your commands. This is especially important if you’re accessing your Pi from public Wi-Fi or other unsecured networks.
Efficiency: SSH is lightweight and fast, making it ideal for remote command-line operations. Whether you’re editing files, running scripts, or monitoring processes, SSH gets the job done quickly.
Compatibility: Almost every modern operating system supports SSH, so you can connect to your Pi from virtually any device. Plus, there are tons of free SSH clients available, such as PuTTY for Windows and Terminal for macOS.
Read also:Judith Kliban The Revolutionary Cartoonist Who Redefined Humor
How to Enable SSH on Your Raspberry Pi
Enabling SSH on your Raspberry Pi is a breeze. Follow these simple steps to get started:
- Boot Your Pi: Power up your Raspberry Pi and make sure it’s connected to your local network via Ethernet or Wi-Fi.
- Open Raspberry Pi Configuration: From the terminal, type
sudo raspi-configand hit Enter. - Select Interfacing Options: Navigate to the "Interfacing Options" menu and select SSH.
- Enable SSH: Choose "Yes" to enable SSH and then exit the configuration tool.
- Reboot Your Pi: Restart your Pi to apply the changes by typing
sudo reboot.
And just like that, SSH is ready to go! Now, let’s move on to the next step: finding your Pi’s IP address.
Locating Your Pi’s IP Address
Your Pi’s IP address is its unique identifier on the network. Think of it as your Pi’s home address on the internet. Without it, you won’t be able to connect remotely. Here’s how to find it:
- Using the Terminal: Type
hostname -Iin the terminal to display your Pi’s local IP address. - Checking Your Router: Log in to your router’s admin panel and look for your Pi’s device name in the list of connected devices.
- Using Advanced IP Scanner: Download a free network scanning tool like Advanced IP Scanner to locate your Pi’s IP address automatically.
Once you have your Pi’s IP address, jot it down—you’ll need it for the next steps. Now that we’ve covered the basics, let’s explore some free tools for remote access.
Free Tools for Remote Pi Access
There are plenty of free tools available to help you access your Raspberry Pi remotely. Here are some of the best options:
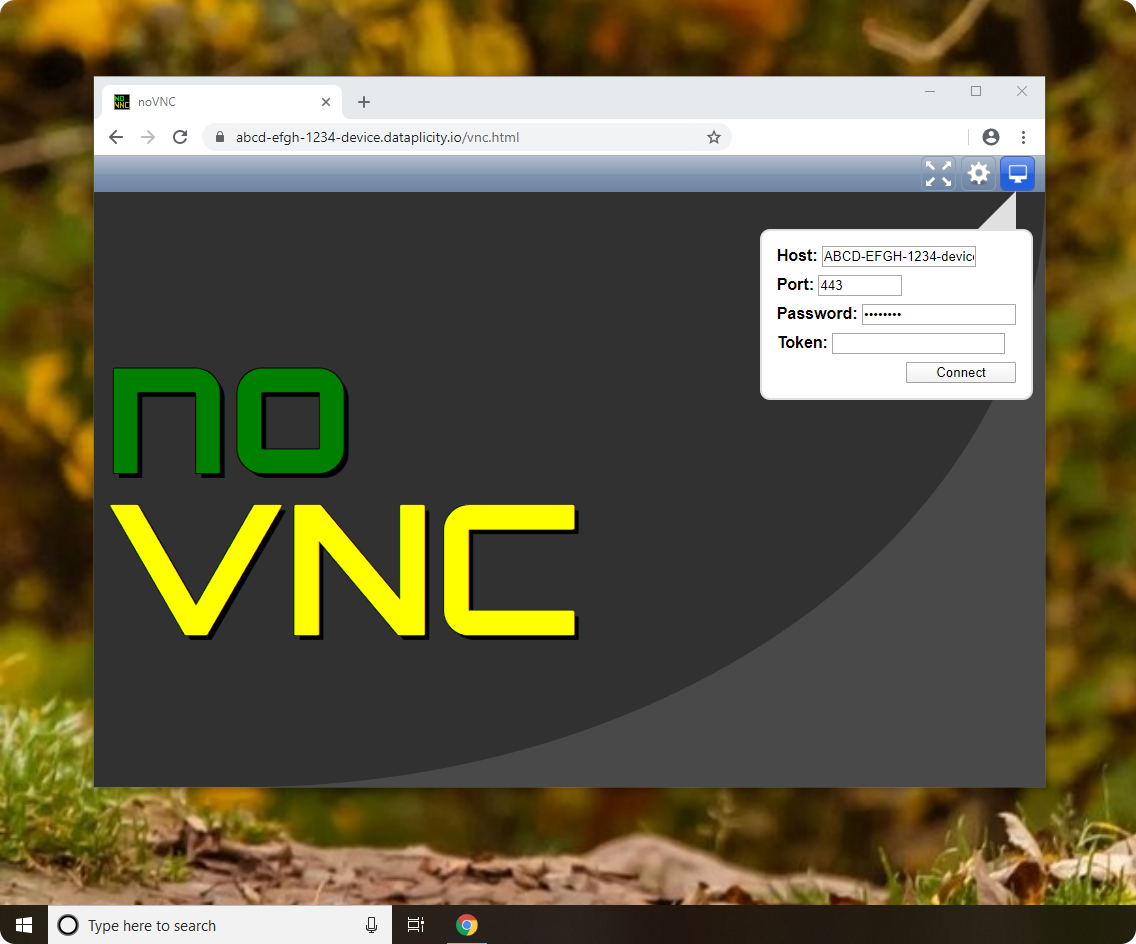
1. VNC Viewer
VNC Viewer lets you access your Pi’s graphical desktop from any device. It’s perfect for tasks that require a graphical interface, such as browsing the web or editing images. To set it up:
- Enable VNC in the Raspberry Pi Configuration tool.
- Download the VNC Viewer app on your device.
- Enter your Pi’s IP address and connect.
2. TeamViewer
TeamViewer is another popular choice for remote access. It’s easy to set up and offers a user-friendly interface. Plus, it works across multiple platforms, so you can access your Pi from anywhere.
3. ngrok
ngrok is a powerful tool that allows you to expose your Pi’s local server to the internet. It’s great for testing web applications or sharing files remotely. To use ngrok:
- Download and install ngrok on your Pi.
- Run
ngrok http 80to create a secure tunnel to your Pi’s web server. - Share the generated URL with anyone you want to grant access to.
These tools are just the tip of the iceberg. Depending on your needs, there are many other free options available.
Setting Up Port Forwarding
Port forwarding is a crucial step if you want to access your Pi from outside your local network. It allows incoming connections to reach your Pi by forwarding specific ports to its IP address. Here’s how to set it up:
- Log in to Your Router: Open your router’s admin panel in a web browser.
- Find the Port Forwarding Section: Look for a menu or tab labeled "Port Forwarding" or "Virtual Servers."
- Add a New Rule: Enter your Pi’s IP address and the port number you want to forward (e.g., 22 for SSH).
- Save and Apply: Save your changes and restart your router if necessary.
With port forwarding configured, you can now access your Pi from anywhere in the world using its public IP address.
Dynamic DNS: Solving the IP Address Problem
Public IP addresses can change periodically, which can make remote access tricky. That’s where Dynamic DNS (DDNS) comes in. DDNS assigns a permanent domain name to your Pi, even if its IP address changes. Here’s how to set it up:
- Choose a DDNS Provider: Popular options include No-IP, DuckDNS, and Dynu.
- Create an Account: Sign up for a free account and create a hostname for your Pi.
- Install the DDNS Client: Download and install the DDNS client on your Pi to keep the hostname updated.
With DDNS in place, you can access your Pi using a memorable domain name instead of a changing IP address.
Securing Your Remote Pi Access
Security should always be a top priority when accessing your Pi remotely. Here are some tips to keep your Pi safe:
- Use Strong Passwords: Avoid using common passwords like "password" or "123456." Instead, use a mix of letters, numbers, and symbols.
- Enable Two-Factor Authentication: Add an extra layer of security by requiring a second form of verification.
- Limit SSH Access: Restrict SSH access to specific IP addresses or use a firewall to block unauthorized connections.
- Keep Software Updated: Regularly update your Pi’s operating system and software to patch security vulnerabilities.
By following these best practices, you can enjoy the benefits of remote access without compromising your Pi’s security.
Troubleshooting Common Issues
Even with the best preparation, things can go wrong. Here are some common issues you might encounter and how to fix them:
1. Can’t Connect to Pi
Make sure your Pi is powered on and connected to the network. Double-check the IP address and ensure that SSH or VNC is enabled.
2. Port Forwarding Not Working
Verify that your router’s port forwarding settings are correct. Try restarting your router and testing the connection again.
3. DDNS Not Updating
Check that the DDNS client is running on your Pi and that it’s configured correctly. Restart the client if necessary.
With these troubleshooting tips, you’ll be back up and running in no time!
Conclusion: Unlock Your Pi’s Potential
Accessing your Raspberry Pi remotely for free is easier than you might think. By following the steps outlined in this guide, you can take full control of your Pi from anywhere in the world. Whether you’re managing a home server, running a media center, or just tinkering with code, remote access opens up endless possibilities.
So, what are you waiting for? Grab your Pi, follow the steps, and start exploring the world of remote computing. And don’t forget to share your experience in the comments below. Who knows—you might inspire others to join the Pi revolution!
Table of Contents
- Why Access Pi Remotely for Free?
- Understanding SSH: The Backbone of Remote Access
- Locating Your Pi’s IP Address
- Free Tools for Remote Pi Access
- Setting Up Port Forwarding
- Dynamic DNS: Solving the IP Address Problem
- Securing Your Remote Pi Access
- Troubleshooting Common Issues
- Conclusion: Unlock Your Pi’s Potential
Viralkand: The Ultimate Guide To Turning Heads And Boosting Your Online Presence
John Stone Nashville Schedule: The Ultimate Guide For Fans
Arkansas Car Shows This Weekend: A Revving Good Time!
Remotely access Pi desktop

How to Remotely Access Raspberry Pi from Windows, Mac & Linux Beebom
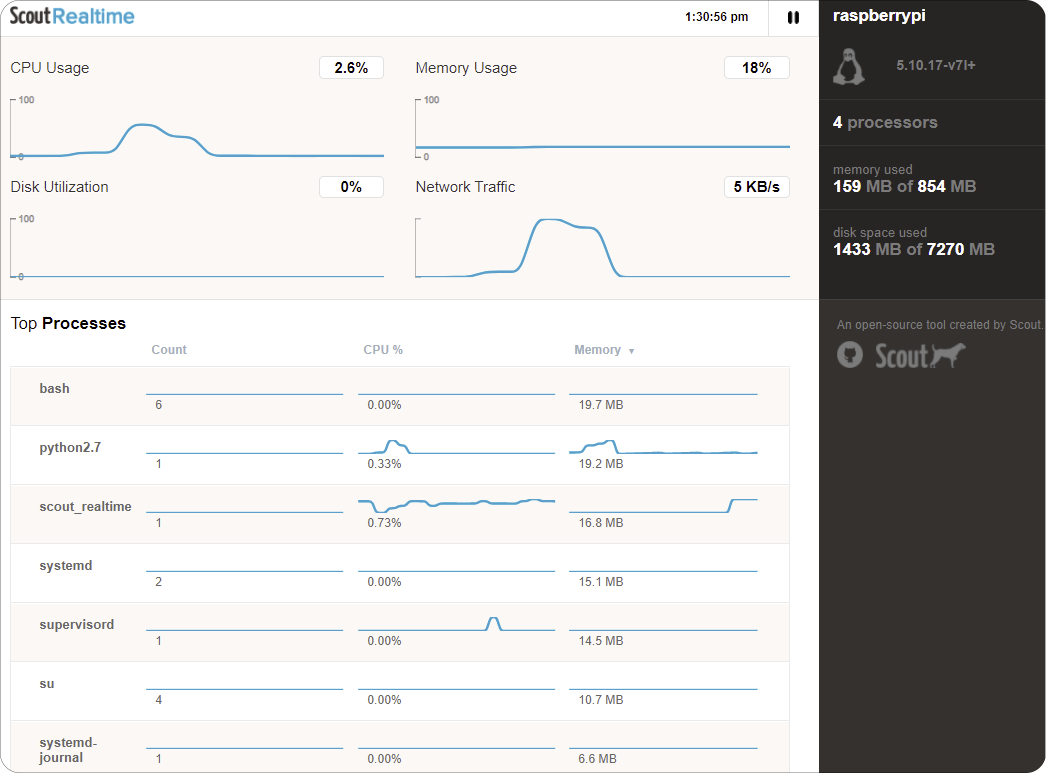
Remotely access Pi system stats
